Emails have become an integral part of our daily activities. For many of us, a day will not be complete without checking at least once our electronic mailboxes. And for those who are away from families and loved ones, life without an email is simply unthinkable.
Organizing emails can save you a lot of time especially when you’re receiving a lot of spam emails. For instance, all emails coming from family members can be stored in a folder different from the default Inbox folder. In the same way, emails from friends or from different mailing lists can also be separated into different folders. A bulk folder can also be created to store emails coming from someone you don’t know. Organizing your emails can also expedite the retrieval of previous emails in that you only need to search a specific folder rather than the entire Inbox folder.
To configure your mailer to deliver new emails automatically to different folders, you need to use filters or message rules as Outlook Express calls them. The step-by-step instruction of doing this using the Japanese version of Outlook Express is given in the following paragraphs. For the English version, click here.
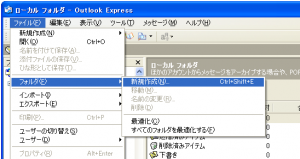
The first thing to do is to create a folder where the emails will be stored. For instance, if you would like all emails coming from family members to be stored in a folder named “family”, you need to create this folder first. To do this, open Outlook Express. Then, click the File (ファイル) menu and select the Folder (フォルダ) menu item. This will pop-up a submenu as shown in the figure below. In this submenu, choose the New (新規作成) menu item.
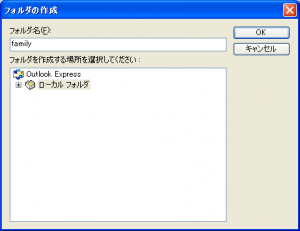
 The Create Folder (フォルダの作成) dialog box shown below will be displayed. In this dialog box, specify the name of the folder in the Folder name (フォルダ名) entry field and select the folder in which to create the new folder in the list provided. For example, enter ‘family’ in the folder name and select Local Folders (ローカル フォルダ) as the parent folder for ‘family’. Click the OK button to create the folder.
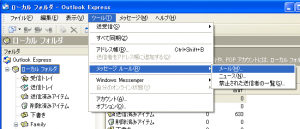
 Now that the folder is ready, we can start creating the message rule that will automatically move all emails coming from family members into this folder. To do this, click Tools (ツール) in the main menu and select the Message Rules (メッセージ ルール) menu item. See figure below. In the submenu, select Mail… (メール)
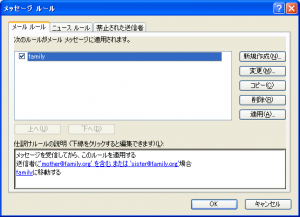
 The Message Rules (メッセージルール) dialog box with the Mail Rules (メール ルール) tab shown below will be displayed. This dialog box displays existing message rules. From this dialog box, you can create, modify, copy, remove, or apply message rules to existing emails. The description of each rule is also shown in the bottom window.
 Now, to create a new one, click the New (新規作成) button to bring out the New Mail Rule (新規のメール ルール) dialog box shown below. (NOTE that if you have not defined any message rules previously, this dialog box will be immediately displayed instead of the Message Rules dialog box above.) With this dialog box, we can define the conditions for our rule, the actions that will be taken if the conditions are satisfied, the rule description and the name of the rule.
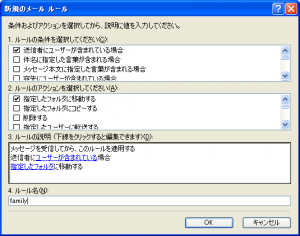 For the condition, select the first option, i.e., the line “Where the from line contains people.” (送信者にユーサーが含まれている場合) If this condition is satisfied, we want the email to be stored to a specified folder. So for the action, choose the first option, which is “Move it to the specified folder.” (指定したフォルダに移動する) Note that as we made the selection by checking the appropriate check boxes, the Rule Description (ルールの説明) window also changes.
In this window, we can specify more details to the selected condition and action statements by clicking on the underlined values. In particular, to specify the details for the “From line” in our condition statement, click the underlined phrase “contains people” (含まれている) in the Rule Description window. This will popup the Select People (ユーサーの選択) dialog box shown below.
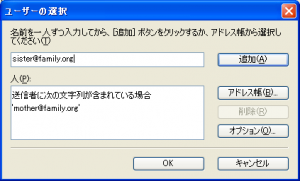 In the top text box, enter the email address of the person whose email you would like to be automatically delivered into the family folder. Then click the Add (追加) button. The added email addresses will appear in the next window. Continue adding until you have entered everyone. If you’re done, click the OK button. To specify the folder, click the underlined word “specified” (指定したフォルダ) in the Rule Description window. This will display the Move (移動) dialog box shown below. Select the family folder and click OK.
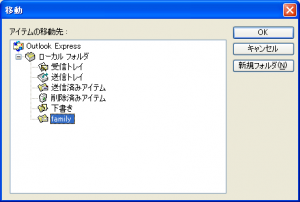 After this, the Message Rule dialog box displayed earlier will be displayed again with the newly created rule. If you want to create another one, click again the New button. If you want to apply the newly created rule to existing messages, click the Apply Now (適用) button. If you’re done, click the OK button to close the dialog box.
You can play around with the different conditions and actions listed in the New Mail Rule dialog box to get the desired results. For instance, you can use the condition “Where the Subject line contains specific words” (件名に指定した言葉が含まれている場合) to filter all emails from a given mailing list. In this case, you can use the mailing list’s name as the target word since it is usually included in the email’s subject.
The above illustrates how to create simple message rules to organize your emails. Although outlook express is used in the above example, the same principle can be applied to other mail reader applications. Check if your email application provides messaging rules or email filters and start organizing your emails today.
__________
Read more guide articles at myguide.bagarinao.com